When it comes to personalizing your car or giving it a fresh look, one of the easiest and most affordable upgrades you can make is painting your brake calipers. Painting brake calipers not only enhances the aesthetic appeal of your vehicle but can also protect them from dirt, rust, and wear. If you’re wondering how to go about this process, the good news is that painting brake calipers at home is quicker and easier than you might think. In this guide, we’ll take you through a simple, step-by-step process for painting brake calipers at home, all while addressing common concerns and providing tips for a professional finish.
Read more Area 325: Complete Guide to Location, Lifestyle & Opportunities
Why Should You Paint Your Brake Calipers?
Is painting brake calipers worth it? Absolutely! Not only does it give your car a more customized look, but it also protects the brake calipers from corrosion caused by moisture, salt, and road grime. Plus, it’s a great way to make your vehicle stand out from the crowd.
You might be wondering if painting brake calipers on the car is possible. The short answer is yes! While many people prefer to remove the calipers for a more thorough job, it’s entirely possible to paint brake calipers while on the car if you follow the right method.
Additionally, it’s an inexpensive way to boost your car’s appearance without spending too much. So, let’s dive into the quick and easy method for painting brake calipers at home!
Materials You Will Need for Painting Brake Calipers
Before you start painting brake calipers, it’s essential to gather the necessary materials. While the process is straightforward, having everything you need on hand will save time and ensure a flawless finish.
Basic Materials for Painting Brake Calipers:
- Brake Caliper Paint (Choose high-temperature paint to withstand heat)
- Painter’s Tape and Plastic Sheeting
- Brushes (A small detailing brush works well for precision)
- Jack and Jack Stands (For lifting the vehicle)
- Cleaning Supplies (Brake cleaner, degreaser, and rag)
- Gloves and Safety Goggles (For protection)
Optional Materials:
- Brake Fluid (For cleaning tough grime)
- Hammerite Paint (For a long-lasting finish, especially on metal surfaces)
- Heat Resistant Gloves (To handle hot calipers)
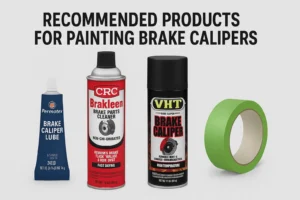
Table 1: Recommended Products for Painting Brake Calipers
| Product | Type | Features | Price Range |
|---|---|---|---|
| Rust-Oleum Brake Caliper Paint | High-Temperature Paint | Durable, heat-resistant, available in various colors | $10-$20 |
| VHT Caliper Paint Kit | High-Temperature Paint | Includes everything you need (brush, cleaner) | $25-$35 |
| Hammerite Paint | Metal Enamel Paint | Excellent for durability and finish | $15-$25 |
| 3M Painter’s Tape | Masking Tape | Strong adhesion, easy to remove without residue | $5-$10 |
Step-by-Step Guide to Painting Brake Calipers at Home
Now that you know the necessary materials, let’s walk through the process of painting brake calipers in a quick and easy way. Whether you are hand painting brake calipers or using a brush, following these steps will ensure you get the job done right.
Step 1: Preparation
- Lift the Car: Use a jack to lift your vehicle and secure it with jack stands. Make sure it’s stable before proceeding.
- Remove the Wheels: Take off the wheels to expose the brake calipers.
- Clean the Brake Calipers: Clean the brake calipers thoroughly with brake cleaner. You want to remove any dirt, dust, or grease so the paint adheres properly. A degreaser can also be used for tough grime.
Step 2: Masking
- Tape Around the Caliper: Use painter’s tape to protect areas that you don’t want to paint, such as the brake pads and the rotor.
- Cover the Surrounding Area: Lay down plastic sheeting around the caliper to protect the suspension and other parts of the vehicle from overspray.
Step 3: Painting the Brake Calipers
- Apply the Paint: Use a brush or spray paint (if you’re comfortable with spray painting) to apply the paint evenly over the brake caliper. If you are hand painting brake calipers, work in thin layers to avoid drips.
- Allow Drying Time: After applying the first coat, let the paint dry for 10-15 minutes before applying additional coats. Depending on the paint, you may need 2-3 coats for complete coverage.
- Curing the Paint: Allow the paint to cure fully before reassembling your vehicle. Depending on the paint you use, curing time may vary (refer to the manufacturer’s instructions).
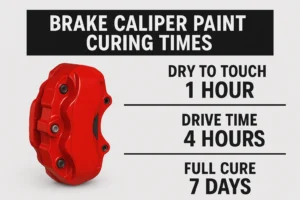
Table 2: Brake Caliper Paint Curing Times
| Paint Type | First Coat Dry Time | Full Cure Time |
|---|---|---|
| VHT Caliper Paint | 10-15 minutes | 24 hours |
| Rust-Oleum Brake Paint | 15-20 minutes | 24-48 hours |
| Hammerite Paint | 30 minutes | 48 hours |
Pros and Cons of Painting Brake Calipers
Before diving into paintings brake calipers at home, it’s important to weigh the pros and cons. Here’s a quick breakdown to help you decide if this DIY project is worth your time.
Pros:
- Custom Appearance: You can choose any color you like, with red being a popular choice for a sleek, sporty look.
- Protects Calipers: The paint provides a protective layer against rust and wear.
- Affordable: DIY paintings brake calipers is significantly cheaper than professional services.
Cons:
- Time-Consuming: While paintings brake calipers on the car can save time, it still requires patience.
- Possible Warranty Issues: Some manufacturers may void your warranty if you modify parts of the braking system. Always check the warranty terms before proceeding.
- Heat Resistance: Not all paints can handle the extreme heat generated by the brake system.
Conclusion
Paintings brake calipers is a quick, easy, and cost-effective way to enhance your vehicle’s appearance and add a layer of protection. Whether you choose to paint brake calipers red for a bold statement or opt for a more understated color, this DIY project is a great way to show off your personal style. Just remember to follow the proper steps, be patient with the curing process, and keep in mind any potential warranty concerns. With the right materials and a bit of effort, you can achieve a professional-looking finish at home.